IKEA BESTA Hack - DIY Cabinets & Window Seat
- Hilary Kalb
- Apr 24, 2025
- 13 min read

Updated: Jan 2
My two-year-old will be ready to transition out of her crib any time now, so I wanted to get a jump start on her new room. Ideally, my two girls (2 and 4) will even share a room, so I took over our guest room / office to allow for more space. Additional storage was a must because the room only has one small closet, and I wanted to to add some character to the space. My heart was set on built-ins with a cozy window seat.
After thinking through my options, I decided to leverage the IKEA BESTA system as a base, and I couldn't be happier with how this project turned out. The best part? I made it! What's cooler? This project's success had little to do with skill or experience. It really came down to problem solving. And it didn't take a ton of tools! I'm a firm believer that anyone who wants to do it, can.

Let's dive into the how to how I turned IKEAs functional BESTA system into a beautiful, custom built-ins.
Table of Contents
Plan
Of course you'll want to check out Pinterest for inspiration, but I'd recommend the following before getting too far into planning:
Inspect the area for any obstacles
Are there any access points or other obstructions? I really wanted to take the units up to the ceiling, but the room has an interconnected smoke detector in the way. Rather than mess with that myself or pay an electrician to move it, I decided to adjust my vision and go as high as I could without blocking access to the smoke detector.
Measure the space
Figure out how wide you can go with the cabinets and window seat. Ensure you leave a couple inches around the window, just in case it needs to be replaced (a real threat in SWFL with hurricane season quickly approaching, IYKYK).
Our window is off center, so I needed to take this into account too when thinking about how to make the space feel symmetrical.
Leverage online planning tools
I knew I wanted to use IKEA as a base, so after doing some research I narrowed it down to the BESTA because the weight limits or dimensions of the other systems didn't plan out. No regrets going with the BESTA!
The free, online BESTA Planner was super helpful and easy to use. Input the measurements of your room then add and arrange the various products.
I played around with a TON of layouts before landing on the following:

Drawers and doors increase the price pretty quickly, so consider more open shelving if you want to keep costs down.
Prep
You'll see mixed reviews on the necessity of removing carpet and baseboards before adding built-ins, but I like to do both. Removing the carpet helps prevent uneven settling over time, reduces the risk of damage to the built ins in the event of any water damage incurred in the carpet, and makes it much easier to replace flooring in the future. (Keep in mind you may need to hire out the carpet reinstall.) Baseboard removal allows the built-ins to square up against the wall.
Baseboard Removal
Cut caulk between the baseboard and wall using a utility knife then gently wedge a small pry bar between the wall and baseboard, tapping the hammer to loosen the baseboard until it can be removed. Use an oscillating tool to cut a section of the baseboard for partial removal.
(Stay tuned for another post dedicated to baseboards.)
Carpet Removal
Pull up on carpet and use a utility knife to cut back unneeded portion, keeping a few extra inches in length. Use a pry bar and hammer to remove tack strips. I like to use my laser level when cutting the carpet to get a straight cut.
Build
As a beginner DIYer, I don't have a ton of tools, and you won't need them either! This project only uses two different saws - a compound miter saw (super user friendly) and a jig saw (slight learning curve). A nail gun is also super handy to have, but not necessary. I've linked a full list of tools and materials at the end!
Build Base
Build a base frame out of 2x4s for support, spacing, and height. Stand the 2x4s up right or lay them flat depending on desired height. I wanted my frame to be a bit higher, so I stood them up right.
Frame out the perimeter then add three 2x4s between where each unit (i.e. drawer or cabinet) will go. This will provide the necessary support and allow for face framing between each unit.
Use a level and adjust for any uneven flooring. (Popsicle sticks are great for this!)
For inset drawers, the frame should match the dimensions of the BESTA drawers and cabinets.
Predrill to avoid splitting and use 2.5" wood screws to secure.
Note: I started this project thinking I wanted overlay drawers. This would have been challenging with the cabinets I chose, so I decided to change it to inset after starting. Not a big deal, but ideally I would have extended my base a couple inches. Instead, I just ended up adding a second layer of trim as needed for the baseboards and trim around the drawers later.

Assemble Units
Follow instructions to build the IKEA BESTA drawer boxes first.
The weight limit of each BESTA box is limited to 110lbs (50kg). To add structural support, cut 2x4s to the exact height of the BESTA drawer and add two between each drawer (one at the front, one at the back). These will bear weight rather than the BESTA boxes. Attach 2x4s between each drawer, then attach each drawer to another before attaching to the base.

Next follow the IKEA instructions to assemble the cabinets.
Assembly was pretty straightforward. I waited to attach the top box to each of the cabinets until after I added the outlet extenders to make it easier to move off and on the base frame. If you don't have outlets to worry about, you can add the top boxes now.
Outlet Extenders
The wall contained outlets behind where each of the cabinets would go. Although the room has plenty of other outlets, I didn't want to block these in case I wanted to use them down the road for wall sconces, etc. I decided to extend the outlets into the cabinets themselves, a small project that was surprisingly straightforward!
Caution: Turn off the breaker before removing the outlet cover and adding the box extender. I like to test using a voltage pen to make sure the power cut.
Here's a breakdown of the steps I took:
Measure: Turn off the breaker and remove the outlet cover, then measure the position of the outlet to determine the position on the cabinet.
Cut: Use a pencil to mark up the position on the cabinet. Use a small drill bit to cut each of the four corners then use an oscillating tool to cut out the remainder of the lines.
Attach: Pull the outlet box out from inside the wall enough to slide the outlet box extender up and over. Move the cabinet back into position and adjust the outlet extender as needed. Wait to reattach the cover


Attach the Cabinets
Next it's time to secure the units to the wall and drawers. With the cabinet in place, I drilled a shallow hole where they'll fasten to the wall, then I pulled them off the base for two reasons: 1) I still needed to attach the top boxes, and you need access to the back of the unit to do so, and 2) I needed to use my stud finder to determine if I would use wall anchors or drill directly into the studs.
After attaching the top boxes according to the IKEA instructions, I inserted wall anchors or predrilled based on their position.
Once complete, I was ready to move the cabinets back onto the frame. You may need two people to move them as they're a bit top heavy with the top boxes attached. Clamp the cabinets to the drawer boxes and drill pilot holes before securing with wood screws. Once the cabinets are secured to the drawers, secure to the back wall following the BESTA instructions. Then reattach the outlet cover.

Window Seat
Installing the top of the window seat is super easy! First layer the perimeter of the BESTA boxes and in between each box with scrap 1x4s. This will raise the height of the top of the seat to where you can add face frame (1x2s) consistent with the rest of the built ins. I predrilled holes and screwed the 1x4s into the 2x4s around the perimeter and used a nail gun with 1" brad nails to attach the middle 1x4s.

Next you'll need a sheet of plywood for the seat itself. I didn't want to buy a table or circular saw just for one cut, so I took my dimensions to Lowe's and they made the cut for me using 3/4" plywood. It fit perfectly. I used wood glue to secure the plywood to the 1x4s then topped with some weights until the glue dried.

You'll notice the above photo already has trim. As I mentioned at the beginning, I ended up changing the style once I added the cabinet fronts from overlay to inset. So I'll come back to talking about adding trim later, for now you can dry fit as a quick gut check!
Filler Strips
Filler strips tend to be inevitable when converting IKEA furniture to built ins, as they will rarely fit perfectly. Depending on the dimensions of the room and the size of the cabinets you use, you may or may not need filler strips. I wound up with around 8 inches on the right side and 3 inches on the left that I needed to fill in order to get the desired built-in look. If you have a super small gap, you may just be able to skip this step and add trim. Otherwise you'll need to add a filler.
At this point I had played around with the cabinet doors enough to realize my plans for overlay doors and drawers would overcomplicate things. I decided to adjust my plans and switch to inset for both the face frame and fillers. It's important to determine which overlay as this changes how you measure and cut.
Visit the links below for posts dedicated to inset fillers:
Sand
Now that everything's built, it's time to sand. You'll see mixed reviews on the necessity of sanding IKEA furniture before painting, but I've had so many issues with painting IKEA before, I err on the side of caution.
Lightly sand all the IKEA furniture using 120 grit sandpaper, either by hand or using an orbital sander if you have one. You'll also need to sand the plywood on the window seat until smooth. I used my orbital sander where I could and lightly sanded by hand to reach some of the corners. Use a lighter grit as needed to get the window seat feeling smooth.
Add Trim
This is where the project really starts taking shape!
As I mentioned earlier, I changed the design from overlay to inset in the middle of the project, so I had already done some face framing (which also goes to show that some things can be done a little out of order, and that's OK too). So you'll see that in some of the images.
If you haven't already done so, now is a good time to install cupboard doors and drawers.
We'll end up removing them to make priming and painting a little cleaner and easier, but it's crucial to make sure everything aligns properly before adding the trim. Use painters tape as a temporary drawer pull.
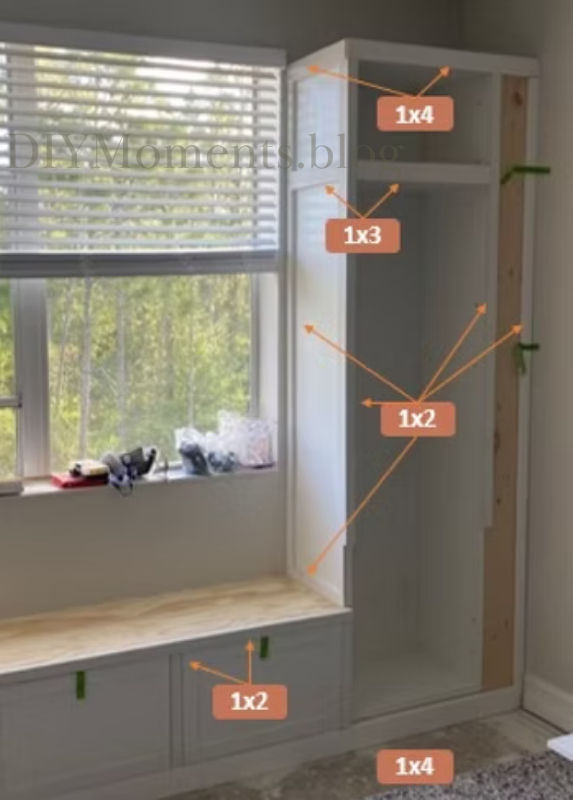
Most of the trim is super straightforward. Follow the diagrams below and use a nail gun with 1 1/4" brad nails to secure trim. There are a few areas that are a little bit tricky that I'll go into a bit more detail on below.
In face framing, the vertical pieces are called stiles and the horizontal pieces are called rails.
Important: End the 1x2 stiles around the front of the cabinet to allow space for where the cupboard doors will go.

Cupboard Door Trim
End the 1x2 stiles on either side of the cabinet front where the cupboard door goes. Use 3/4" square dowels on either side of the cupboard door. Before securing, dry fit and open and close cupboard door to ensure proper alignment. Adjust the cupboard doors following the IKEA instructions, and/or adjust the distance of the dowels.

Cupboard Shelf Extension
While not necessarily "trim", this is a great time to fix this next issue.
For some awkward reason, the shelf depth doesn't extend to the cupboard door.
There's no way I could have lived with with that gap. One cheap and and cheerful solution: add a 1/2" square dowel to extend the shelf depth.


Drawer Trim
The key to successfully adding trim surrounding the window seat drawers is making sure everything is level and the drawers can open and close smoothly. Dry fit 1x2s and use spacers to maintain a consistent distance to the drawer. My favorite spacer for the job? Paint stir sticks!

Front of the Window Seat
Hopefully you'll have a better experience fastening trim to the upper front of the window seat. I found the plywood was very tricky to fasten nails to or glue to adhere to, which makes sense given that plywood is just thin layers of wood glued together. It's definitely better to nail into the 1x4 beneath the plywood if possible.
I ended up using c-clamps and a combination of nails and wood glue (lots!) to fasten, and after a bit of time was able to get it secured.
Upper Moulding
Crown moulding definitely elevates the look of built-ins, but making the cuts can be challenging. Thankfully this project only required one outside corner, while the other side was a basic miter cut. Both of which I was able to accomplish with my compound miter saw.
Stay tuned for a detailed post dedicated to crown moulding!
Once cut, use a nail gun to attach the crown to the top of the 1x4, making sure it's completely level and the corners line up. (I did this by myself, but this is another place where having a second set of hands would be helpful.) Any minor variances can be filled with caulk.

Fill Holes
This is arguably the most painful part of the whole project. While not 100% necessary, I've found this next step totally worth it.
IKEA furniture is customizable, which is great! But unless you think you'll change your design down the road, you won't need the hundreds of tiny, unattractive peg holes. IKEA sells covers you could use as an alternative, but I've found filling the holes gives a much cleaner, elevated look.
Make sure to determine the spacing of the shelves before filling any of the holes! I used painters tape to cover the ones I wanted to skip over so I wouldn't make any mistakes.
Use wood filler to fill the holes. (I've seen people use their bare hands to apply, but I prefer using disposable gloves to avoid absorption into my skin.) Lightly sand any excess using 120 grit sandpaper and reapply as needed. It should be completely smooth; no visible indentation. I found that about half or more required a second round of wood filler and sanding given the depth of the holes.
You'll also need to fill all the brad nail holes with wood filler - much easier!
This step requires a ton of patience, but is well worth it depending on your desired level of perfection.


Paint
Painting IKEA furniture is not my favorite. Many people don't have any issues at all, and I'm still not quite sure where the problem lies. I sand and use "all the right things", but I still tend to have some problem areas. People swear by sugar scrub, or that is comes down to sanding, or the primer used. I've tried sanding, as well as different primers and paints, so I'll share what's worked best for me. I'd definitely recommend a light sand if you haven't already done so!
Caulk
Before primer and paint, caulk all the seams. I like to wrap a baby wipe around my finger then gently wipe along the caulk line to remove any excess and get a clean, smooth line. This part is very satisfying as all the tiny imperfections disappear!
Prime
Since I've had issues getting paint to fully adhere in the past, I tried two different primers for this project. Valspar Bonding Primer (recommended by Lowe's) and Bin Zinnser shallac-based primer. Although it's pricey, Bin Zinsser far and away out-performed the other bonding primer. (So much so that I had to completely strip the section I applied the Valspar primer to and start over.)
There were still a couple of areas I had a little trouble with, but after a few coats of primer, I was able to get there.
Paint
I went with the Sherman Williams Agreeable Grey for a few reasons. First, it's all over our house, for better or worse. But it's neutral, and I'll likely incorporate color another way. Second, this is the only window in the room, so there wouldn't be enough natural lighting to illuminate inside the shelving. As much as I wanted to introduce color here, it wouldn't have looked right.
I used an oil based cabinet paint, specifically Valspar Cabinet and Furniture paint. The color actually turned out a tad darker than the walls because it's oil based, which might throw some people, but I actually kind of liked it.
Once you're done painting, it's time for the carpet reinstall! Unless you have prior experience installing carpet, or plan to do a ton in this space to make it worth while to invest in the tools, this is the one place I'd say to hire out. (I did!)
Add Hardware
I wanted something vintage inspired, and I found these pulls and knobs on Amazon for a decent price. I wish I could have ordered the exact number I needed to cut costs, but hopefully I'll be able to use them for another project!


I'm so happy with the end result. It added so much storage and character to the space, and I can't wait to make it even better as I fully transform this office / guest room into the sweetest little girls' room. Be sure to follow on Instagram and subscribe for updates on Natalie's new room and more DIY projects you can try too!
Tools and Materials Needed
Tools Needed
Pry bar
Hammer
Sander (or sand paper)
Clamps (edge clamp & I also like this workbench with clamps)
Nail gun (optional)
Paint stir sticks (to use as a spacer)
Level
Materials needed
Besta Frames (use code V4PZJ2)
1x2, 1x3, 1x4 for trim (primed MDF or common board)
1x10 (as needed for filler strips)
2x4 (for base frame)
Crown moulding
Plywood (3/4")
Wood nails (2 1/2")
Brad nails (1" and 1 1/2")
Sand paper 120 grit
Primer (Zinsser Bin shallac based primer)
Paint (cabinet paint)

Comments